Powered By Blogger

Friday, September 28, 2012

Mozzarella Sticks with Buttermilk Dip

Mozzarella Sticks with Buttermilk Dip

These little gems seem like the perfect tailgating take-along! 

INGREDIENTS:


For the Mozzarella Sticks:

  • 12 stick s of string cheese or 12 pieces of mozzarella cut into 4 x 1/2 inch sticks
  • 1 1/2 cups panko-style breadcrumbs (or Progresso Italian-style Panko breadcrumbs)
  • 4 teaspoons Italian seasoning
  • 1/2 teaspoon table salt
  • Freshly ground pepper to taste
  • 4 eggs
  • 1 cup of all-purpose flour
  • Canola oil for frying

For the Buttermilk Dip:

  • 1/3 cup buttermilk
  • 1/4 cup sour cream
  • 2 tablespoons freshly squeezed lemon or lime juice
  • 1 tablespoon olive oil
  • 1 1/2 teaspoons honey
  • 2 tablespoons minced fresh basil
  • 2 tablespoons minced green onions
  • 2 tablespoons minced flat-leaf parsley
  • 1/4 to 1/2 teaspoon of table salt to taste
  • Freshly ground black pepper to taste

METHOD:


  1. Dredge the mozzarella sticks: Spread the flour and breadcrumbs on separate plates (pie plates work well for this). Add the Italian seasoning, salt and pepper to the breadcrumbs and mix well. Place the eggs in a small bowl and beat them lightly.
  2. Drop a piece of cheese into the flour and roll it around until it is well covered. Shake off the excess flour and dip the cheese into the egg mixture before rolling it in the breadcrumbs until well coated. One last time, dip the breadcrumb coated cheese back into the beaten egg and roll again in breadcrumbs to create an extra crispy coating. Set aside on a clean plate and repeat with the remaining cheese sticks. Once all of the mozzarella has been breaded, place the plate into the freezer uncovered and freeze until the breadcrumb coating is firm, at least 2 hours.
  3. Meanwhile, make the buttermilk dip: In a small bowl, whisk all of the ingredients together until well combined. Cover with plastic wrap and refrigerate until ready to serve.
  4. Fry the mozzarella sticks: Pour enough oil into a large heavy-bottomed pot to come to a depth of at least 2 inches. Using an candy thermometer, heat oil until it reaches a temperature of 350°. Fry the mozzarella sticks in batches, being careful not to overwhelm the oil, until crispy and browned on the exterior, about 5 minutes. Drain on paper towels.
  5. Repeat with remaining mozzarella, allowing the oil temperature to rise back to 350° between batches. You can place the finished mozzarella sticks in a 200° oven to keep them warm while the others fry.
  6. Serve immediately with buttermilk dip.
http://www.foodpeoplewant.com/mozzarella-sticks/

Today I Wore...

 
Sweater - LOFT
Shirt - Steinmart
Pants - Limited

Tuesday, September 25, 2012

Today I Wore...

 
Sweater: Madison from Belk
Pants: NY&Co

Manicure Maximizer

 
I am not a good manicurist, especially on my own nails.  I often try to save time by doing them myself and avoid the nail salon, but I inevitably do a horrible job that I'm not happy with and end up having to do them again which takes more time than if I had just gone to the salon in the first place!  One of the things I'm worst at is the shaping.  I'm just not good at filing my nails and never know which shape to go for.  Lucky for me, this article at Self.com showed me the best shape for your nails!


"Watch your form: The oval shape is hands down the best way to get a mani with marathon endurance. "There aren't any rigid corners like with a square nail that can smack against stuff, keeping nails healthier and polish on for longer," says Dennis Gross, M.D., a dermatologist in NYC.

Get buff: Filing in a back-and-forth motion is a tempting shortcut—the girly push-up of nail maintenance. The problem is, you'll end up with rough edges, making nails prone to chips, says Susan Nam, owner of Polished Beauty Bar in NYC, who tends the nails of Charlize Theron and Leighton Meester. Put in the extra effort: Use a file with medium grittiness, and move in one direction—left to right—and repeat."
 
Laurent Darmon

Monday, September 24, 2012

Halloween Mantle

Pinned Image

I love to decorate my mantel for each holiday and Halloween is no exception.  I really like the ideas in this picture.  The twigs on each side of the fire pit are what makes it, to me.  It's such a cute idea but doesn't go overboard. 

tatertotsandjello.com

ThreeCheese Chicken Alfredo Bake


Three Cheese Chicken Alfredo Bake

1 (16-ounce) package penne or elbow macaroni
2 (10-ounce) containers refrigerated Alfredo sauce
1 (8-ounce) container sour cream
1 (15-ounce) container ricotta cheese
2 garlic clove, minced
3 cups cooked chicken, chopped
2 large eggs, lightly beaten
1/4 cup grated Parmesan cheese
1/4 cup chopped fresh parsley
2 cups mozzarella cheese

Prepare pasta according to package directions; drain and return to pot. Stir together all ingredients except mozzarella cheese. Spread mixture into a lightly greased 13- x 9-inch baking dish. Sprinkle evenly with mozzarella cheese. Bake at 350° for 30 minutes or until bubbly.

Friday, September 21, 2012

Today I Wore...

 
Both top and pants: Ann Taylor

Homemade Hair Treatments

6 Home Recipes For Hair {naturally beautiful hair}

home recipes for hair  According to Beauty Tips 411, here are three home recipes for hair that are perfect for damaged and dry hair types. These are frugal and easy ways to make a homemade conditioner.

Homemade Hair Treatments For Damaged Hair

1. Avocado Deep Conditioner Hair Mask- Using 1 small jar of mayonnaise and 1/2 avocado. Mix all ingredients, smooth into head being careful to work it to the ends, Use shower cap or plastic wrap to seal body heat in and leave on for 20 minutes.

2. Mayonnaise Your Hair - Apply 1/2 cup of mayonnaise to your dry hair, work in really well, cover your head with a plastic wrap, and let it set for about 15 minutes.

3. Olive Oil Hair Mask - Combine 2 tablespoon honey and 3 tablespoon olive oil together. Apply thoroughly and then cover with plastic wrap and set for 15 minutes.

These beauty tips and treatments are great on any type of hair and safe enough for those with sensitive scalps as well.

http://www.tipjunkie.com/all-crafts/home-recipes-for-hair/

Halloween Cake

Pinned Image

Wow!  This looks perfect for the annual Halloween Cake Walk.  I think it'll be a winner.
  • 1 1/2 cup(s) flour
  • 2/3 cup(s) cocoa
  • 2 teaspoon(s) baking powder
  • 1 teaspoon(s) baking soda
  • 1/2 teaspoon(s) salt
  • 1/2 cup(s) buttermilk
  • 1 cup(s) canned pumpkin
  • 2 teaspoon(s) vanilla extract
  • 3/4 cup(s) butter, softened
  • 1 cup(s) dark brown sugar
  • 1 cup(s) granulated sugar
  • 3 large eggs
  • 1 egg yolk

Directions
  1. Line the bottoms of two 8-inch cake pans with parchment paper and lightly butter.
  2. Sift the flour, cocoa, baking powder, baking soda, and salt together. Stir the buttermilk, pumpkin, and vanilla extract together in a small bowl. Beat the butter and sugars together using an electric mixer on medium speed until light and fluffy. Beat in the eggs and yolk, one at a time. Reduce mixer speed to low and alternately beat in the flour and buttermilk mixtures in thirds.
  3. Pour the batter into the prepared pans. Bake until a tester, inserted in the center, comes out clean--about 35 minutes. Cool layers completely before icing.
  4. Step 1: Frost Beat 6 ounces softened cream cheese using a mixer set on medium-high speed until fluffy. Add 1 1/2 cups confectioners' sugar, 2 1/4 teaspoons cocoa, 1/4 teaspoon cinnamon, and 3/4 teaspoon vanilla and beat on low speed until well combined. In a separate bowl, beat 1 1/2 cups heavy cream with 3/4 cup confectioners' sugar and a scant 1/4 teaspoon orange food coloring on medium-high to soft peaks. Gently fold the whipped cream into the cream cheese mixture until well combined. Spread 1 cup frosting between the two layers and use the remaining frosting to ice the top and sides of the cake. Chill 30 minutes and proceed to step 2. Makes 3 cups.
  5. Step 2: Glaze Place 4 ounces of chopped bittersweet chocolate, 1 tablespoon cold unsalted butter, and 3 tablespoons corn syrup in a medium heatproof bowl. Bring 1/2 cup heavy cream to a boil, pour it over the chocolate, and let sit for 3 minutes. Gently stir, using a whisk, until smooth. Let sit for 3 to 5 minutes, until the glaze thickens slightly. Pour the glaze onto the center of the frosted cake and smooth out to the edges to allow the glaze to drop over the sides. Makes 1 cup.

Thursday, September 20, 2012

Monday, September 17, 2012

Million Dollar Spaghetti

Pinned Image

This is just another take on bad spaghetti, which I love.  This recipe differs from the one I usually use (Paula Deen's) because it calls for cottage cheese, cream cheese, and sour cream.  I plan to try it tonight.  Let you know how it goes.

Ingredients
 
1 lb. of Ground Beef
1 jar of Spaghetti Sauce
8 oz of Cream Cheese
1/4 cup of Sour Cream
1/2 lb. of Cottage Cheese
Whole Stick of Butter
8 oz. of Noodles
Bag of Sharp Cheddar Cheese

Go ahead and put your oven on 350.
Boil those noodles!! While they are boiling, go ahead and mix up the cream cheese, sour cream and cottage cheese.  Make sure that it is mixed up VERY well.  Then.. go ahead and brown your meat. Make sure its good and brown and drain it! Then pour your spaghetti sauce over it!

Take a few slices of your butter and put them in the bottom of your casserole dish, Then layer HALF of the noodles in the bottom of the dish! Pour the nicely mixed up creamy mixture on top of the noodles. and SPREAAAAAD it all over!
Then add the rest of your noodles and put a few slices of butter on top of those noodles. Now pour the red sauce and meat on top! and once again SPREEAAAAD

Now place that awesome casserole in your oven for 30 minutes!

After those 30 minutes take the dish out and pour some cheddar cheese on the top and put it back in the oven for 15 minutes!


Friday, September 14, 2012

Pour Me

RSVP Silicone Slip-On Pour Spout  SEEN IN REAL SIMPLE MARCH 2011 MAGAZINE!!!

What a brilliant idea!  I am the worlds worst at making a mess when I cook and this is often the reason; spilling when I try to transfer from pot to bowl.  These handy little silicone attachments help direct the pour of wet or dry ingredients more accurately.  They attach to any thin-lipped mixing bowl, pot, pan, or jar.  And to top it off, they are dishwasher safe!  Only $5 at www.thekitchenoutlet.com

Today I Wore...

 
Top: Old Navy
Pants - Loft
Shoes: Toms

Wednesday, September 12, 2012

Missing the Beach...

The weather is just starting to turn a wee bit cooler.  Not too much, and it's still pretty warm in the afternoons.  But the mornings have a chill and so do the evenings and no one is sweating and sweltering in 105 degree temps anymore. 

And I kinda miss it.

I'm a summer girl.  I can't help it.  I do love the Autumn weather, it's not that I don't.  Autumn is definitely my second favorite season.  But I just love the long days and the swimming pool weekends and the beach, oh yes I do love the beach.  I've been (finally) uploading photos of our beach trip from my phone to my computer and it made me realize just how much I miss the beach and how I would love to be there right now.  We took our family trip to Cherry Grove, South Carolina this year and I fell in love with this stretch of beach.  It's a cozy little beach town with a small amusement park, a pier, and quite a few ice cream parlors.  I definitely want to go back next year. 


Tuesday, September 11, 2012

Friday, September 7, 2012

Thursday, September 6, 2012

Monogram Pumpkin


I saw this idea on Pinterest (of course!) and had to try my own.  I bought the white pumkin, the ribbon, and the sparkly spider from Michael's.  I cut the "H" and the dots with my Cricut.  I think it turned out really cute!  I even made a few for some friends. 

Today I Wore...

 
Top, Sweater, and necklace - NY&Co
Pants - Gap

Wednesday, September 5, 2012

Lowcountry Lemonade

Pinned Image


I love the color of this drink!  Can't wait to try it.  Add a drop of blue curacao to peach Schnapps and lemonade.  Line the rims with sugar.  It's that simple.  A must try for my next Bunco. 


http://www.weddingbycolor.com/highlyfavoredbride/milestones/6081

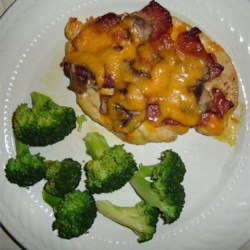
Aussie Chicken


My family loves Outback Steak House and one of our favorite things on the menu is the Alice Springs Chicken.  I found this recipe online and it is very similar to Alice Springs Chicken.  I left the mushrooms off because no one in my house is a fan, but everything else was the same.  My son really liked the homemade honey mustard. 

Ingredients
  • 4 skinless, boneless chicken breast halves - pounded to 1/2 inch thickness
  • 2 teaspoons seasoning salt
  • 6 slices bacon, cut in half
  • 1/2 cup prepared yellow mustard
  • 1/2 cup honey
  • 1/4 cup light corn syrup
  • 1/4 cup mayonnaise
  • 1 tablespoon dried onion flakes (I used onion powder instead)
  • 1 tablespoon vegetable oil
  • 1 cup sliced fresh mushrooms
  • 2 cups shredded Colby-Monterrey Jack cheese
  • 2 tablespoons chopped fresh parsley

Directions

  1. Rub the chicken breasts with the seasoning salt, cover and refrigerate for 30 minutes.
  2. Preheat oven to 350 degrees F (175 degrees C). Place bacon in a large, deep skillet. Cook over medium high heat until crisp. Set aside.
  3. In a medium bowl, combine the mustard, honey, corn syrup, mayonnaise and dried onion flakes. Remove half of sauce, cover and refrigerate to serve later.
  4. *Heat oil in a large skillet over medium heat. Place the breasts in the skillet and saute for 3 to 5 minutes per side, or until browned. Remove from skillet and place the breasts into a 9x13 inch baking dish. Apply the honey mustard sauce to each breast, then layer each breast with mushrooms and bacon. Sprinkle top with shredded cheese.
  5. Bake in preheated oven for 15 minutes, or until cheese is melted and chicken juices run clear. Garnish with parsley and serve with the reserved honey mustard sauce. 

*I grilled my chicken on my indoor grill pan rather than cooking it in a skillet.  It worked really well.

      http://allrecipes.com/recipe/aussie-chicken/